
Often when I tell people that I'm in print class, they go "huh?" because the term "print" these days is synonymous with computers and whatnot. But what I'm talking about is the age old craft of printmaking. I've noticed a rise in print artists in the past few years, I imagine it's some kind of rebellion against the automatic, easy, sleek, monotonous way we print these days. I've been enjoying a lot of what's out there in the print world in the last couple of years and I've been salivating to take this class.
And I haven't been disappointed yet-I've got a really great teacher that has a passion and explains things really well. He's pretty interesting, too.
The first assignment was to carve/print a block that was a self portrait of some kind, it was pretty open ended. I invested in the nicer carving tools, and I'm glad- they cut through the lino block like buttah.
I thought about it and decided to go with a silhouette style self portrait- I love silhouettes, not to mention that time period, and I've seen a lot of cool stuff printed on old book paper, so I went in that direction.
So first, you make your drawing and plan out what will stay and what will get carved away. Planning is crucial. Then you have to "flip" your image (with tracing paper) so that it will print correctly. This is very important if you are doing text, maps, etc that have to be read a certain way! And then you use transfer paper to transfer the image to your block. By the time you get the design on your block, you've traced it like four times!
Next you color code the areas you want to keep or carve away. I chose to keep the black areas and carve away the red.

By color coding my block, I know what I've already carved because now it's a different color!

I bought this old book for like a buck because I really liked the embossing on the cover. It came in handy for this. Maybe I'll do a project with the cover sometime:

So you have several options to print this block. You can ink your block, lay the paper on it and then use a big flat ice cream spoon to apply pressure ("spooning" in print class has an entirely different meaning, lol) or you can use the ram press.
Behold the ram press:
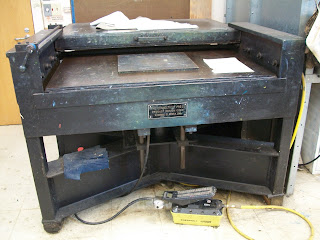
And guess where it was made? Norwalk, Connecticut! I knew I liked this class.
The ram press uses a lot more pressure than your spoon, so it'll give you a darker print with crisper lines. You place your block face up with your paper on it, then close the big lid on the press. It runs on an air compressor (you use the foot pedal) to raise the bottom of the press up to smoosh your paper/block against the lid. It raises really slowly, you'd have to wait there for quite awhile to smash your finger or something.
There's a sign above the press not to use it for anything else than printing, imagine the smooshing possibilities! My teacher even said he'd smoosh something cool (within reason!)if you brought it in to class.
I first "spooned" my print (left) and then ran it through the ram press (right). The one I did with the press was darker and crisper, but I like them both. I was pretty pleased. The "noise" from the carving on my block doesn't bother me too bad on my print, sometimes its a nice aesthetic. You can carve it away if you want so it's a cleaner look.

My mind is swarming with the possibilities! Soon I'll get into doing multi-color blocks and using the letterpress. So much fun.
My teacher isn't going to give us any specific assignments, he wants us to explore art making on our own, which is nice. I think schools don't really teach artists how to think for themselves, so this is refreshing. We're to do about a print a week, it can take longer if it's complex. Gotta get cracking!
My classroom is lovely, too:

Stay tuned for more craftiness!


No comments:
Post a Comment