December 23, 2010

O Christmas Table

Well, after our carved alien fruit, we spent the rest of the semester designing and creating a table. We were limited in size (our teacher didn't want us going much beyond 3 feet in any direction) so I wound up making an end table. I would have loved to have made a retro kitchen table, a coffee table that could display things, or carve a carousel table, but I wound up making this one. Having wood and metals in the same semester was a challenge- both are time consuming and so I opted to do a table I could finish more easily without living in the wood classroom.

Even so, I got rushed at the end. I would always see wood students racing to finish their projects at the end of the semester and would say "that won't be me". Ha! It was me! I missed a couple days of school due to snow and that threw me off. It was also a major pain to fight to use the equipment, everyone seemed to need the table saw. Everything takes twice as long as you think it will.

In all, I liked the process, just wish I could have enjoyed it a bit better without being so rushed. I also didn't like the nasty rash I got from dealing with wood- I was so itchy I wanted to claw my arms off! I don't know if I was allergic to poplar or to sawdust or possibly walnut- I read recently that people can have allergic reactions to it. I didn't use walnut, but other people did and I was exposed to everyone's dust.

You had to have at least one mortise and tenon joint (which are a pain to cut) and mine had eight to attach the rails to the legs, so it fit the bill. I cut the rail shapes on a bandsaw and then had to file and sand those curves- also a pain! Sanding thru like 4 grits of sandpaper was a pain too- my hands went numb from the electric sander!

I had decided from the beginning to paint my table, so I opted to make it out of inexpensive poplar rather then maple or cherry or something. It doesn't look too bad here after I sanded the heck out of it, but it has a yellow or green cast to it and there's streaks of reddish purple in it too. Other woods are prettier!


Here you can see a purple streak:

I routed the table top and shaped the legs, too:

Thought I'd show what other people did in my class, you had a good deal of freedom:

My friend Angie did this, a lot of joinery on each end. There's at least 32 mortise and tenon joints in this!

This was a well made table but it's not for clutsy people like me- I'd smack into the pointy tabletop!

There was also the option of making a bench- it's pretty much like making a table but your table legs stick up to form the armrests.

One girl painted this top:

One guy did these three table that share a leg- you draw at the tallest one (the top lifts up) and can set your supplies next to you on the smaller table. It takes up a good chunk of space, though.

Someone from the other class did an armadillo table:
 One girl did this cat desk (cat heads on the bottom, fat tail at the top):

One girl did this table complete with "legs"...does it need to go to the bathroom?

 A girl from the other class did this mustache table. I liked it but wasn't crazy about the irregular tabletop.

My table isn't complete, you just had to have one coat of something on it for crit so all it has on it now is black milk paint. It needs another coat or two and then a coat of satin finish sealer. But that's not happening til after Christmas!


You know what I really want to make? Shaped cutting boards! I know how to glue up boards and clamp them and shape them with a bandsaw and a router...now I need all that equipment in my dream art studio!

November 19, 2010

Art Auction

Recently I participated in the annual student art auction on campus. The problem with studio classes is that you are usually making things that either you want to keep or no one will want to buy (like the odd practice still lifes that we did for most of the semester in painting class or the 20 body parts for sculpture) and that I don't have much extra time to make things to sell. When this year's auction rolled around, I actually had stuff to submit- extra prints from print class last semester. I picked a few out to auction and sold four of them. The Student Art League takes a 25% cut of the bids, but even after their cut, I had made $18.75! Not bad, I was pleased. I found out later that my woodshop teacher had bought one of them!

I don't think I ever got around to posting the rest of what I did in print class, I'll have to show that sometime. I would love to do more in that area, but the classes fill up crazy fast- way faster then the other studios.

I was pleased with a lot of the artwork up for bid- in past years there has been a lot of crap because they will let anyone submit anything. Last year I was outbid and didn't win anything, so it was a pleasant surprise to win three of the four things that I wanted.

So here's what I won:


This is a little (about 8x10") photo/painting collage on board by Mel Keiser. She has done some really great paintings in shows on campus so I was excited to own one of hers. I fell for the hair/flowers area. I don't like a lot of collages because it's often hard to mix materials and make it work but I think it works here. I paid $14 for it.


This intaglio print is called "A Lot of Frames to Fill" and it's by Makenzie Cherban. This is done with a metal plate and she scratched all those lines into a coating on a metal plate that was then put in acid to eat away the lines. Printing is time consuming as well- you fill the lines in with ink and then wipe wipe wipe the surface of the plate- when it goes through a press, the enormous pressure pushes the paper into the lines and you get a print. 

It's pretty large and I liked all the ornate frames- it made me think of the one I spraypainted black. Worth $9 to me.


I had seen this unframed in a different show and liked it- so I was glad to see it in the auction. Entitled "Barflies", it's by Courtney Bryan and I thought she made a fun screenprint. I liked the positive/negative space and bright colors. I liked the fly silhouettes. Registration (things lining up) is always an issue for printmakers. Sometimes mis-registration works and sometimes it doesn't but I like the way the black outline is off. I paid $31 for this, which was a bit expensive but if I were to frame it myself I'd be spending a chunk on that so it actually is a good deal.


This is the one I wished I'd won:

I really enjoyed this painting- I really liked the tones/colors used in it and the technique is good. It's larger- about 2.5' square. A big reason why I liked it so much was that I did a series of similar b&w handprinted photographs way back in 2001 that were very well received (and won me prizes and money and clients). I would have loved to have had this up with them on my wall. Sometime I will have to scan and show those. I would love to have that series become a book.

A lot of people want to collect art but don't know how to go about it. Clearly I'm not collecting art as an investment, but for enjoyment. I think that often people worry too much about collecting names or spending lots of money. I don't believe that collecting art has to be expensive, quite the opposite. I've found great stuff for pennies. I feel that a lot of the expensive art out there isn't worth it. A lot of art is expensive because of time and materials but just because it is a Warhol doesn't mean that it is the best thing ever- artists generally have periods of artmaking that are better than others and this could be part of the lesser stuff. And there might be some no-name thing that is the best thing ever.

A lot of people say "I don't know art but I know what I like". Exactly. Collect what you like. It's ok to do so! Then it will be worth something to you.

The art world is a two way street- creator and collectors. I think it's important to support the art world-  I like it when people look at or buy my stuff so I make an effort to see what other people are doing. If I fall in love with something, then I'll make an effort to own it. Art makes our world interesting.

For crying out loud, support your artists- who wants to have a boring cookie cutter living room anyhow? If I can duplicate your living room down to the manufactured BB&B art on your walls, then there's a problem.

Be unique.


And can you tell that I will need a LOT of wallspace in my future abode?

November 17, 2010

Lace Box

The third project in Metals class was to make a box. So I thought "Oh, a camera box would be fun- I'll have lots of time to make something more complicated" and designed this:


I was really tempted to make it in paper and call it good! The front part would come out like a drawer and house some little photo artifacts of bygone days- BD, or Before Digital. There would be a little hook and eye to keep the drawer shut. And maybe a back piece that opened to show an old photo.

So I started on that, rollerprinting copper with a canvas texture. But I didn't get far- I'd forget my toolbox or forget stuff in the car. One day I sent half an hour searching for the metal I'd prepared, only to find it hiding in my backpack- I thought I was going crazy!

And then I hit other snags- like Mom in the hospital. And me being sick. And Hanky needing surgery. And then it became a matter of getting something done to turn in.

Crit was terrible- no one had anything finished. Including me. That doesn't happen. I was disappointed and embarrassed. But I got an extension to turn it in after the weekend and busted my butt to finish it in time.

It's a little harder to make square boxes then round boxes so I redesigned and made this:


I was inspired by the pin/earring/necklace pewter boxes that I had as a child. Those were a bit hokey though. I rollerprinted lace into the copper. I soldered and made a lid and base that actually fit together pretty well (you can't see the ring on the underside of the lid) which is a bit tricky with metal. The flowers are not permanently attached, you can take them off and wear them as pins. I rollered the copper to be thin, cut out my shapes, filed the edges and then hammered the edges to make them even thinner. Then I used a dappling block (a metal cube with different sizes of bowl shapes cut out of it) to hammer my flat shapes into a cupped flower shape.

There are holes drilled in the walls of the base so that one can string it and wear it as a pendant if desired. I didn't have time to add anything inside, but maybe I'll put a flower in there in the future. I applied patina and sanded it away just enough to really show the lace pattern. I sanded the edges and bottom to make them a brighter color for contrast.

Overall, I like my box and I'd like to do my camera still. I'm pleased that I figured out on my own how to solder the flowers and that it worked! I strung the flowers onto the wire and hung them upside down from steel cross-locking tweezers and applied solder to where the wire met the bottom flower. It flowed and worked! Then I had to twist the wire to work harden it, the heat from the torch anneals it to make it soft and you can't have a floppy pin back or it will bend and break. Then I filed the ends to be pointy enough to go through a shirt (but not too pointy!). They're held in the lid with little chunks of eraser for now.

I have a good amount of lace-textured copper left over- I should make a bracelet or something with it. I think it's pretty funny to make such girly stuff with non-girly materials and tools- metal and files and hammers and whatnot.

It's fun making stuff with big girl toys- like torches!

October 28, 2010

Girly Spider Webs

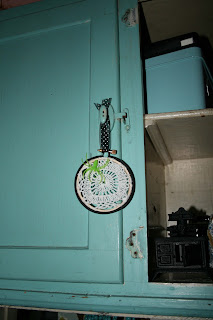
I can't claim to have come up with this idea, I saw the idea here on Betz White's craft blog and decided to try it myself. Out here it's pretty easy to find inexpensive (PA has plentiful antique malls and junk stores, I love it) handmade doily items, so I found some that were cute but that I wouldn't be pained to cut up.

So you take your doilies...

...and find some wooden embroidery hoops. Paint the outer hoop black and leave the inner one natural.

Add some ribbon and spiders and voila!


You get some pretty easy and fast girly Halloween decorations!
I used an 8" hoop on the square doily, and got a 6" and two 3" hoops from the rectangular one.
I wanted to make my own beaded spiders, but that didn't happen this year.

I think they're cute enough to have up all year- sans spiders!


I like decorating my hutch!

You like my little cast iron stove?

Have a Happy Halloween!

October 25, 2010

Thrift Store Spooky

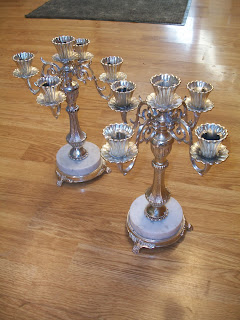
I found these candelabras for literally $3 for the pair at a local thrift store. But what to do with them? They were almost cool, but not quite. They were pretty ugly in their original state- the center posts weren't even metal, but cheaply painted grey plastic. The arms were of some kind of base metal, definitely not the good stuff. And there was some sort of heavy stone at the bottom (you do not want to get socked in the head with one of these!). But I looked past all that and saw some potential.


 I took my happy can of black glossy spray paint, and voila!

Insta-macabre:


Painting them (it took several tries- lots of nooks and crannies!) makes the pieces more about their form then colors. I love how they turned out- I don't want to put them away!

I also love having an old beat up black piano- perfect for scenes like this! Usually we put the headstones outdoors, but this year I leaned them against the wall and added my spooky cloth (love $1 stores!), crows and my glitter skull. I like my Halloween to be a bit glam.

I so love Halloween- if I had oodles of $, you know what I'd do? I'd buy some big old cool spooky looking house (I'd own a bunch of houses) and devote it solely to Halloween. I'd have so much fun making it over into a deliciously spooky haunted mansion of my own. And I'd let people tour it, too. And so what if the shutters droop and the paint peels and there's cobwebs inside? It's a Halloween house, for crying out loud! That's the dream.

That, and a house devoted to Christmas.

September 24, 2010

Best. Present. Ever.

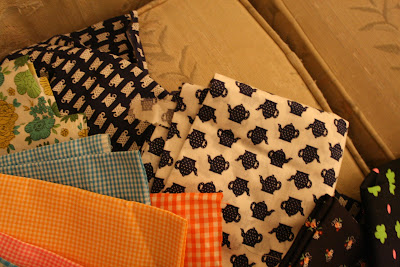
The other day when Mom came home she had THREE big boxes that she had picked up from the Post Office. She had helped pack them while she was still in CA- boxes of vintage fabric, that is. my aunt and grandma had gone through stuff and sent it to us.

I totally love vintage fabric and it's crazyness, so it was a great surprise!


 I love the teacups and teapots!

 This came with pieces cut out- appliques? I so wish there was more than a quarter yard, this was one of my faves.

 Love the Raggedy Ann and Andy too!
I don't know what I'll do with this stash yet, but the wheels are spinning!

I kept about half for myself, the rest Laura wanted or it was just too ugly! There is good crazy fabric...and bad crazy. Ha ha.

This is also a lesson NEVER to leave pins in your fabric/projects long term- it doesn't take much moisture to cause them to rust! There were a lot of pieces that had rusty pins in it, leaving rusty holes that will hopefully wash out or take some kind of treatment. Some pins were so rusted that they had bonded to the fabric- it took pliers to pull them out!

September 22, 2010

Creativity

"Attempt to be creative for the joy it brings. After their noble husbands were called home, Sisters Camilla Kimball, Amelia McConkie, and Helen Richards learned to paint. They not only leave legacies of art, but they will never see a sunset, a face, or a tree the same again. They now perceive subtle nuances of color and form and rejoice in the abounding beauty around them.


Select something like music, dance, sculpture, or poetry. Being creative will help you enjoy life. It engenders a spirit of gratitude. It develops latent talent, sharpens your capacity to reason, to act, and to find purpose in life. It dispels loneliness and heartache. It gives a renewal, a spark of enthusiasm, and zest for life."

-Elder Richard G. Scott
"Finding Joy In Life"

September 15, 2010

For the Birds

Knowledge is power, right? Well I love having crafty knowledge cause that gives me more and more power to change my world to my liking!

I found these three brown plastic birds at a junk store- they cost no more than $3 for the set. I liked their forms but the color was not so desirable.


Enter the magic of spray paint:
And voila! Blue birds. Who'da thunk it? Had to go to several stores to find a decent shade of blue spray paint, most stores do not have a large selection of colors.

And funnily enough right after I did this, I saw very similar birds in a magazine! Same color and everything. I make the trends, what can I say?

I haven't decided yet where to hang them, but one of these days they'll get a place of honor.

September 10, 2010

Pin Holder Frame

So I bought this empty frame for seriously $2 at a local flea market...and I wondered just what to do with it:


It's small, the opening is about 9x7 and it's meant to sit on your dresser. It likely had a mirror in it in a past life. Should I put a mirror in it? A picture? What picture would work?

And then I had an epiphany- I'll make a padded insert and it can hold my collection of pins!

I measured and cut a piece of very thing corrugated cardboard (got it from a shoe box) to fit in the frame and then hot glued some very thin batting (no thicker then felt) to it. I trimmed the batting so that it didn't hang over the edge. I had bought a small amount of tan fine wale corduroy to use for this project- I wanted a neutral color. A vintage distressed tan velvet looked good in my mind, but that's a little hard to come by.

I cut and ironed a piece of corduroy a little larger then my cardboard and wrapped it around the batting and hot glued on the back to secure it. I didn't want hot glue coming through the fabric on the front!


I tacked it in the frame with some hot glue, making sure not to use too much or it would bleed out on the front. It didn't need much to hold it in and I can peel it out if I want to use the frame for another purpose.

But the ugly back didn't thrill me so I glued on another thin layer of cardboard over the edges of fabric and then picked a piece of Amy Butler scrapbook paper from a pack that I have (got it on sale, love it!).

The colors went perfectly with the shade of off-white.

I imagine this living on a dresser with a mirror someday, so I wanted an attractive back on it.


And I loved how the front turned out- totally shows off my pin collection well.


My little bride doll likes it too. ;)

April 14, 2010

Pretty Dresses

It cracks me up how much I've been tied to the wedding industry, despite my Eternally Single status. I'm a wedding photographer after all (since 2001!), and I worked for a year and a half registering couples at BB&B. An when I wasn't registering couples, I was helping people find registry gifts. I got some skillz- I can decipher those cryptic registries. I can giftwrap the oddest items. I can advise on registry etiquette (Do not register for a toilet brush! Ew!). I also worked for a good long while at Craft Outlet, often helping pick out paper for DIY invites or helping with some other kind of wedding project. I do wedding albums for my friends. I often find myself helping with receptions and pre-ceptions and whatnot. If I had an etsy store, I'd probably be selling some cake toppers and other wedding items cause they're fun to make.

I keep tabs on trends in the wedding industry because it's good for business to know what's going on out there. I buy Martha Stewart Weddings cause they're very classy. I love the photos and the color palates and ideas. I've used some of the colors/ideas when I've thrown parties.

I try not to look like I'm some desperate girl with all this wedding stuff, cause I'm not, I just have fun with it. I've always been a sucker for pretty dresses.

I've thought about being a wedding planner because it would be a good combo of my crafty/planning skillz but I don't want to be a real life J-Lo from The Wedding Planner, helping everyone else marry except her.

When I was a teenager, I had a big interest in fashion- I drew sketches of clothes all the time. I was interested in fashion school for awhile. I still think that would be fun. I have designed and sewn a lot of formal dresses and costumes over the years. I think it would be so much fun to design costumes in movies (especially over the top productions) because you're trying to tell about the character through their clothes. I order catalogs like Anthropologie because it's fun to look at the clothes. I like learning about all the different types of fabric and lace, etc.

I admit that every now and then I peek at the modest bridal wedding sites- places like Eternity Gowns and Latter Day Bride. I like to critique dresses and imagine how I'd improve them. I'm glad there are companies that cater to LDS gals like us but I do have some criticisms- the vast majority of gowns I see would be ridiculous on anyone over the age of 22. What about girls my age that get married? Who's looking out for us?

Some look like they just hacked together three different dresses into one, there is no "flow". And others would be great if you were trying to look like you were wearing curtains or if Little Bo Peep is your idol. Some of the dresses I see lately are becoming too huge and very embellished- I'd be embarrassed to wear something "worldly" like that in the temple.

I highly doubt that I'd ever find a gown that I liked in it's entirety when my day comes- I imagine I'll have to hire someone to make me a gown. There's an old wives tale that it's bad luck to sew your own dress. Sometimes I have fun and design dresses in my spare time. If I lived in Utah, I'd seriously think about trying to work for one of these companies and improve their product lines.

Here's the latest sketch I've done:


I'm not a fan of huge "marshmallow" dresses. A dress should complement you, not outshine you. I like a simple elegance. I'm totally into vintage, too. I imagine this one in a fabric that's not too shiny (like peau de soie, which is luminous instead of shiny) or perhaps with a sheerish dotted swiss overlay. I'm a fan of pretty ruffles, and those are fabric flowers on the waistline. I'm also picky about sleeves- they have to be just right or your arms look terrible.
My idea of heaven would be a place where I got to wear pretty dresses all the time. How about you?

April 2, 2010

Irene Bedard


This week I had the opportunity to observe actress Irene Bedard on campus, she's best known for being the voice and inspiration for Disney's Pocahontas. There are a lot of animation students here, and they arranged for her to come. I really enjoyed listening to her speak. Physically she is tiny (five feet tall on a good day!) but she has an immense sense of dignity and inner strength. She talked about her life and her family and her journey. She is a spokesperson for Native American issues and has a non-profit organization that benefits Native American Youth.

She has been married to musician Deni Wilson since the early 1990's. They have a son as well. Their wedding story is funny- they were living in NYC and decided to get married on the summer solstice. She then had gotten a role in the movie Squanto: A Warrior's Tale and was only supposed to be in Canada for a few weeks, but that turned into much longer. Their wedding had to keep getting pushed back and pushed back and finally they came to a solution: they would marry on the set. There was a large beautiful ship with sails for the movie that they wed on. The cast and crew attended. The costumers made her a beautiful native looking dress with shells on it. She had white eagle feathers woven in her hair. Deni was put in a swashbuckling outfit and they were finally wed. It was a funny story.
They have a strong commitment to each other and to their son, which was nice to see. They have a policy that they cannot go more than two weeks without seeing one another, and once their son came along, she has transitioned her work to be more focused on her son. She and her husband do music together, they did a concert as well, though I had to miss that.
She talked about how she did a lot of research on Pocahontas for the role, and that she tried to give her as much strength and dignity as possible. I think that shows, and Pocahontas' strength is a big reason why I like her as a heroine better than other Disney films, despite the historical inaccuracies.

Anyhow, it was refreshing to see a kind, respectful, dignified and noble woman and I'm glad she's a role model. We need more women like her in society.

March 24, 2010

Mask 101

Like I said, I just couldn't bear to have a crappy mask last weekend. I thought I'd show how my mask was constructed. Between working at Craft Outlet and taking sculpture class, I feel like I can construct anything! I bought the white plastic mask base at Michaels, I picked the one with the larger eyeholes (so I could, ya know, see!). But it wasn't very wide (and having a wider mask would make my fat chin smaller) so I decided to enlarge the mask. Not to mention I wanted a butterfly theme and I thought it would be cool to shape the top of the mask. I came up with a template, fiddling with it to make sure it looked good. I cut the shapes out of thin cardboard and hot glued it to the inside and reinforced it with duct tape.


I had a remnant of fake satin (love scouring the remnants at Joann's!) and covered the inside of the mask with it. Using hot glue was bumpy, so I bought some spray adhesive and coated the front of the mask with that. I worked another piece of the satin over it, trying not to have too many bumps- it's hard working a flat item over a curved piece, but I did pretty good. I hotglued the edges of the satin over to the backside for a nice finish.


As you can see, the tape lines show through the satin, thankfully I had some black lace left over from Halloween past, which masked it (ha!) pretty well. I glued the edges of that to the backside as well. I ran black masking tape over where I had glued the edges so it wasn't too bumpy on my face.
After that, I hotglued the feather butterfly at an angle on the front. Gotta love hotglue! There are black rhinestones at the outer corners of my eyes, some of those were self adhesive and some I attached with glue dots.

Attaching the feathers was trickier. The ends come glued to a piece of heavy ribbon, which I could cut as desired (also purchased at Michaels). If I glued them to the backside of the mask, though, the angle was wrong and they would just lay flat against my head. You couldn't see them at all. I played around with them, attaching them with painter's tape till I got the right angle. I wound up having to cut up a cheapo foam craft paintbrush and glue the foam under the wings and attach the feathers on top of that to get the correct height/angle. I was pretty pleased at my ingenuity- the black foam didn't show at all.
I really liked how the feathers turned out, they had movement and that was fun. A while ago I had bought some small ruffled black elastic, not knowing what to use it for. It turned out to be perfect for holding my mask to my face! Serendipity, my friends. Sometimes it pays to hoard. lol
Like I said, I also glued pinbacks to the other butterflies for use on my outfit.

And voila! A classier mask.