Ode to Blue Foam
by Elizabeth Chaney
Blue Foam is everywhere
In my nose,
In my hair...
Yes even in my underwear!
Blue Foam is everywhere. (cough)
I've spent the past few weeks working on my final project for 3-D art- an abstract sculpture carved from dense insulation foam. All the little bits of foam stick to you, no matter what you do! After class I looked the abominable snow-woman! The room looked like a snowglobe! I would shed blue foam wherever I went. I'm so glad I don't have to breathe it in anymore and that this project is over! It was hard coming up with an interesting abstract sculpture and I think mine was fine but maybe now I'd tweak it. It was interesting to learn a new building technique- now I can make anything I want!
The maquette:

You laminate pieces of foam together with spray adhesive:

Then carve with a small saw and files:

Then I pegged the appendages on and covered it with Durham's- a dry putty mix that you mix with water to create a hard skin:

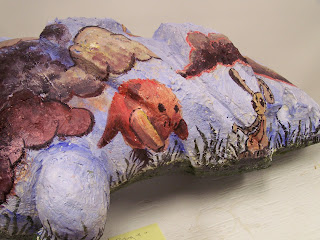
Here is my turkey-stegosaurus-bunny ear-cat whisker-melted peep:
(I got so many funny comments as to what it looked like!)

Don't ask why I gravitated to BRIGHT yellow- I don't know!


Here are a few that I liked
alot from my classmates:


And here's some not-so-hot ones, unfortunately two of the worst offenders took off with their project before I could snap a picture:

Boring shapes, boring color, boring assembly

A Renaissance Yoda Mermaid?

A shrimp? A fetus? And not well carved or painted at that. That kink in the tail is terrible!
My friend Mike did this one...not bad but he needed more
dintinct shading. It looks like it could be in a park! We joked about it needing some graffiti!

The shape is pretty interesting, but the paint does nothing for me! The muddy gray just makes it blah and takes away from the shape. (below)

Everyone in class really gravitated towards this one...but not me. I think they were all distracted by the fact that it was covered in candy....if it was just painted would they find it as interesting??? I think not.

Here's D's bug (or an antelope? I don't know):


D (the girl who couldn't see the carousel horse in my cardboard project) made an ugly bug thing (above) and I was so tempted to walk over to her and say..."You know what I see in your project? If I look real close it looks like...hmmm...a bug!" But I guess I had some class for a moment or two. I liked the bug's body shape before she put a head on it and I don't think the painting goes with the hard edges on the body.
I am getting tired of bailing out crappy slacker art students...I was nice the other day and let a guy from sculpture borrow my leftover spray adhesive...and he thought I gave it to him! And then he walked off with my leftover Durham's cause he thought I said yes to that too. When did I become the supply fairy?? Buy your own! Those cost $16! I probably wouldn't use the leftovers much, but I'm the one who bought them!! And now I'm kicking myself about the Durham's- I got the idea to make little foam ladybugs too late. I guess one of these days I'll buy some more and make some smaller sculptures out of foam leftovers.
Which leads to the question....what do I do with this sculpture now?? It's kinda big (2.5x2.5 ft) to keep but I spent so much time on it to throw it out!

 I only glued the large pic on three sides, creating a pocket for a tabbed card that holds all the gift info on it. Even if this is in a page protector, you can still grab it out from the top (I hate it when people make interactive page elements that you can't access through a page protector!).


 Boring shapes, boring color, boring assembly
 A Renaissance Yoda Mermaid?
 A shrimp? A fetus? And not well carved or painted at that. That kink in the tail is terrible!


